If you've got weeds in block paving, you've almost certainly tried pulling them out or spraying them at some point. A few weeks later, they're back. It's one of the most common frustrations we hear from homeowners across Greater Manchester, and the reason it keeps happening isn't bad luck or particularly aggressive weeds — it's that the underlying problem never gets fixed. Understanding what's actually going on beneath the surface makes the solution a lot clearer.
Block paving is a brilliant surface when it's properly maintained, but its design — individual blocks separated by narrow joints — makes it inherently vulnerable to weed growth if those joints aren't kept in good condition. The wet climate across the North West doesn't help. Oldham, Rochdale, Bury and the surrounding towns see consistent rainfall through autumn and winter, which accelerates the washout of joint sand and creates ideal conditions for moss, algae and weeds to establish themselves. This guide walks through what's actually happening and what genuinely works.
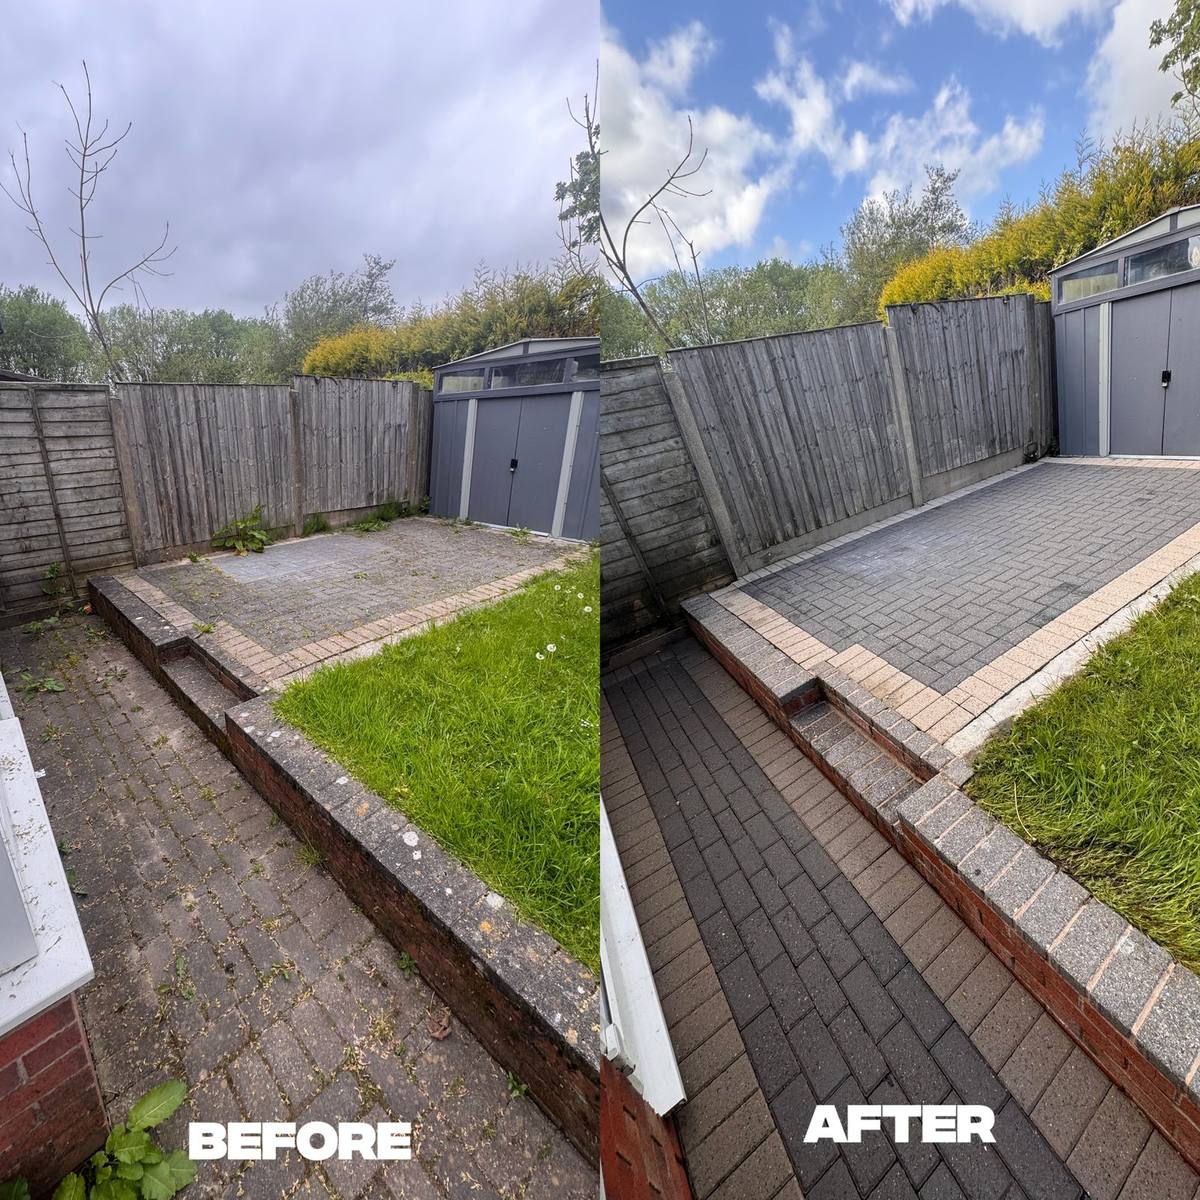
Before and after: rear block paving deep cleaned by C&C Precision, Greater Manchester.
Quick answer: Weeds in block paving keep coming back because pressure washing alone removes the plant but leaves the root system and depleted joint sand intact. The only lasting fix is deep cleaning, removing all organic material, refilling joints with kiln-dried sand, and optionally sealing — cutting off the environment weeds need to regrow.
The Real Reason Weeds Keep Coming Back
Most people assume the problem is the weeds themselves — the wrong type, particularly stubborn roots, or seeds blowing in from a neighbour's garden. The real culprit is almost always the same thing: depleted joint sand. Block paving joints are filled with kiln-dried sand when the paving is first laid, and that sand does two jobs. It locks the blocks together so they don't shift, and it physically fills the joint so there's no space for debris or seeds to accumulate. When that sand washes or erodes away — which it does gradually over time, especially in heavy rainfall — you're left with open channels running between every block.
Those channels collect exactly what weeds need: organic debris, moisture, and eventually airborne seeds. It doesn't take long. A joint that's lost even a couple of millimetres of sand has enough space to act as a seed bed, and once the first plants establish and die back, their decomposed material makes the conditions even better for the next generation. The blocks themselves are irrelevant — it's what's between them that determines whether weeds take hold.
This is why weeds in block paving tend to get progressively worse over the years rather than staying at a manageable level. Each cycle of growth and decay adds a little more organic matter to the joints, which means more fuel for the next round. Without addressing the joints directly, the problem compounds.
How Weeds Actually Get Into Block Paving Joints
There are two main routes. The first is straightforward: wind-blown seeds. Dandelion, moss spores, liverwort and various grass seeds are all light enough to travel significant distances and small enough to settle into a gap of two or three millimetres. A depleted joint in a driveway is a perfect landing spot — sheltered from foot traffic, holding a little moisture, and packed with fine organic material. Seeds that would struggle to germinate on a hard surface find everything they need in an open block paving joint.
The second route is slower but arguably more damaging. Moss and algae establish on the surface of the blocks and at the joint edges, particularly on north-facing areas or driveways shaded by a wall or hedge. As this growth dies back and breaks down over winter, it becomes a thin layer of organic compost sitting right at the top of the joint. That material then feeds the next round of growth and gradually works its way deeper into the joint as rain washes it down. Over a few seasons, what started as surface algae has effectively created a growing medium several centimetres deep.
Even a well-laid driveway with properly packed joints becomes vulnerable within three to five years under typical North West conditions. It's not a sign of poor workmanship — it's simply how the surface behaves without ongoing maintenance. The question is whether you address it properly when it becomes apparent, or keep repeating the same temporary fixes.
Why Killing the Top Growth Never Solves It
Spraying weeds with a path weedkiller or pulling them by hand addresses what you can see above the surface, but it doesn't touch what's happening in the joint. The roots of established weeds — particularly grass and dandelion — can run several centimetres down into the joint, well below where a spray penetrates effectively. Even if the chemical kills the above-ground growth, the root system remains in the joint and often regrows within a few weeks. Manual pulling is even less effective because the roots tend to break off rather than pull clean, and the act of pulling loosens whatever remaining sand is in the joint.
More fundamentally, killing existing weeds does nothing about the empty joint itself. The gap is still there. The organic debris is still there. And within weeks, new seeds will land and find exactly the same conditions that allowed the previous weeds to establish. You can repeat this cycle indefinitely without making any real progress, which is exactly what a lot of homeowners end up doing — spending money on weedkiller every spring and summer while the underlying problem gets steadily worse.
Being direct about this: weedkiller has a role as a short-term measure or as part of a pre-treatment before professional cleaning, but used on its own it is not a solution. It's maintenance of a problem, not resolution of it.
What Happens During a Proper Block Paving Clean
A professional clean is considerably more involved than running a domestic pressure washer over the surface. The process typically starts with a pre-treatment — either a dedicated patio cleaner or a diluted biocide applied to the surface and left to dwell. Dwell time matters. A chemical treatment that's rinsed off after two minutes hasn't had time to break down algae and moss at the root; left for fifteen to thirty minutes, it kills the growth at a cellular level and makes it far easier to remove. This pre-treatment also starts to loosen compacted debris in the joints.
The pressure washing stage then uses a surface cleaner attachment rather than a lance — this delivers consistent pressure across the whole surface without the streaking and uneven cleaning you get from a handheld lance. The high-pressure water flushes organic debris, dead moss, algae and old sand out of the joints, leaving them clean but empty. This is an important point: after a proper professional clean, the joints will have significantly less sand in them than before. That's not a problem — it's the correct state for the next step — but it does mean that stopping at the cleaning stage and walking away would actually leave the paving more vulnerable to weed growth than it was before, not less.
The condition of the joints after cleaning is what makes block paving re-sanding a logical next step rather than an optional extra. The surface is clean, the joints are empty, and the paving is ready to be properly restored.
Why Re-Sanding With Kiln-Dried Sand Is the Key Step
Kiln-dried sand is fine, dry and free-flowing, which allows it to pack tightly into block paving joints when brushed in and compacted. When a joint is properly filled with kiln-dried sand, there's no meaningful gap left for seeds to settle into. The sand grains pack together tightly enough to prevent airborne seeds from working their way down, and the dry nature of the material means it doesn't hold the surface moisture that moss and algae need to establish. It also stabilises the blocks themselves — a driveway with depleted joints will often have slight movement in the blocks, and re-sanding firms everything back up.
The contrast with sharp sand or building sand is worth understanding. Both hold moisture and compact into a dense, damp mass rather than the dry, tight-packed structure of kiln-dried sand. Used in block paving joints, they actively encourage moss and algae growth rather than discouraging it. This is a common DIY mistake — buying a bag of building sand and brushing it into the joints — and the results tend to be disappointing within a season.
For context on pricing, a professional block paving clean typically runs from around £3.50 per square metre for a straightforward clean, £4.25 per square metre for a clean with chemical pre-treatment included, and £5.50 per square metre for a full restoration including re-sanding. Re-sanding only, where the surface has already been cleaned, is usually around £2.00 per square metre. These figures give you a realistic basis for comparing quotes.
Does Sealing Block Paving Stop Weeds?
Sealing is often presented as the definitive answer to weeds in block paving, and it does help — but it's worth being honest about what it actually does and what it doesn't. A good quality sealant applied to properly cleaned and re-sanded block paving will bind the surface layer of kiln-dried sand, making it harder for seeds to work their way into the joint. It also slows moisture ingress, which reduces the conditions that moss and algae need to establish. For a driveway that's been fully restored, sealing is a sensible additional step that extends the results.
The problems start when sealing is applied to paving that hasn't been properly cleaned and re-sanded first. If organic debris is still in the joints, the sealant locks it in rather than out, and weeds can still push through from below. A sealant is only as effective as the preparation beneath it. It's also not permanent — most sealants have a realistic lifespan of three to five years before they begin to break down and need reapplying, and some cheaper products can leave a patchy or discoloured finish if applied incorrectly.
Whether sealing is worth doing depends on the paving and how much traffic it takes. A heavily used driveway where re-sanding is likely to wash out quickly will benefit more from sealing than a lightly used side path. It's a genuine option rather than an essential step, and it shouldn't be presented as a substitute for proper cleaning and re-sanding.
When It's Worth Calling in a Professional
If the joint sand is depleted across a significant portion of the driveway, if weeds are well-established rather than surface-level, or if the paving hasn't had any attention in several years, DIY approaches are unlikely to get you a lasting result. Domestic pressure washers — the kind you'd hire or buy for home use — typically run at lower pressure than professional equipment and use a lance rather than a surface cleaner, which means they shift some debris but don't clean the joints properly and often leave streaky results. More importantly, they remove what little joint sand is left without the operator necessarily realising it, making the weed problem worse in the medium term.
A professional clean and re-sand, done properly, is typically a one-off job that holds for several years rather than a recurring annual expense. If you're in the Greater Manchester area and want an honest assessment of what your driveway actually needs, C&C Precision Precision Washing covers the full region — the quickest way to get a quote is to send a few photos over WhatsApp, and you'll get a straightforward answer without any pressure. You can also see how other customers have found the work on the reviews page.
It's also worth thinking about the wider picture of your property exterior at the same time. If the driveway needs attention, there's a reasonable chance the patio does too — and patio cleaning follows the same principles of pre-treatment, proper pressure washing and re-sanding for jointed surfaces. Grouping work together is usually more cost-effective than booking separate visits.
What You Can Do Between Professional Cleans to Keep Weeds Down
Maintenance between professional cleans makes a genuine difference to how long the results last. The single most useful thing you can do is brush kiln-dried sand into any joints that are looking thin before the winter sets in. Buy a bag from a builders merchant rather than a general hardware shop — you want genuinely dry, fine kiln-dried jointing sand — and brush it in on a dry day, working it into the joints with a stiff brush and then going over the surface a couple of times to compact it down. This is a low-effort job that takes an hour on a typical driveway and significantly reduces how much seed can settle over winter.
Use a stiff-bristled brush, not a jet wash, for routine cleaning between professional visits. A jet wash will shift surface dirt but it also displaces joint sand — done regularly, it steadily empties the joints and accelerates the very problem you're trying to prevent. A brush, a bucket of water and a mild cleaning solution handles everyday grime without damaging the joint integrity.
For moss and algae appearing at the joint edges or on the block surface, treat early rather than letting it establish. A diluted sodium hypochlorite solution — the same chemistry used in professional softwashing work — applied to the affected areas and left to dwell will kill the growth before it has a chance to decompose and feed the joints. You can buy diluted versions from garden centres, though professional-grade products are considerably more concentrated and effective. Apply on a dry day with no rain forecast for at least a few hours, and be careful around plants and metalwork.
Realistic timescales: with a top-up of sand once a year and prompt treatment of early moss or algae growth, a professionally cleaned and re-sanded driveway should hold up well for three to five years before needing professional attention again. Without that basic maintenance, you're likely looking at the joints depleting noticeably within two years and weeds re-establishing from the second season onwards.
Frequently asked questions
Why do weeds grow in block paving but not in concrete?
Block paving has open joints between each block — even when filled with sand, these joints slowly empty through rain and use, leaving a gap that collects organic debris and airborne seeds. Poured concrete has no joints, so there's nowhere for seeds to take hold. The joint is the vulnerability, not the block itself.
Will pressure washing make the weeds worse?
Pressure washing without re-sanding afterwards will actually make the problem worse over time. The high-pressure water clears out whatever joint sand is left, creating even larger gaps for seeds to settle into. That's why re-sanding with kiln-dried sand immediately after cleaning is essential, not optional.
How long does block paving re-sanding last before weeds come back?
Done properly — joints fully cleaned out and packed with good quality kiln-dried sand — you can reasonably expect three to five years before the joints need attention again, assuming normal foot and vehicle traffic. Sealing on top of the re-sand extends that further by locking the surface sand in place.
Can I re-sand block paving myself?
You can brush kiln-dried sand into joints as a top-up, and it's worth doing once a year on a dry day. The problem is that without pressure washing first, you're filling on top of compacted organic matter and old roots — the weeds push through within a season. For a lasting result, the joints need to be properly cleaned out first, which is where professional equipment makes the difference.
Got weeds pushing through your block paving?
Send a photo of your driveway or patio on WhatsApp and we'll come back to you with a fast, no-nonsense price — usually same day.